 Bolo finds this pleasing, but she would like more. |
| Taking Out The Garbage | |
|---|---|
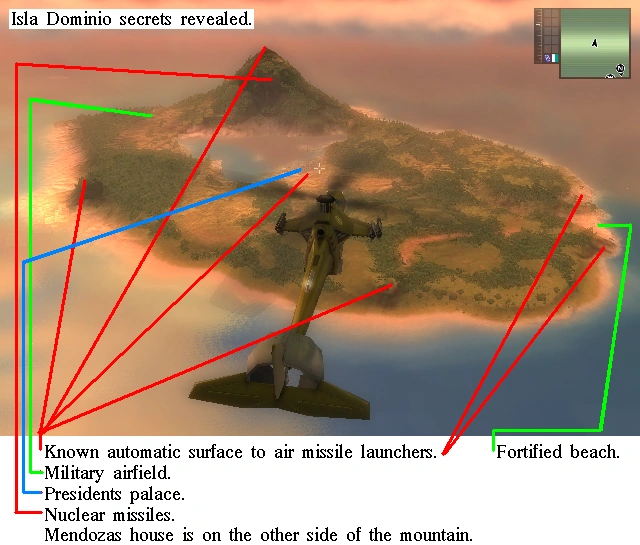 Isla Dominio secrets revealed. Most of the mission takes place here. | |
| Story Mission | |
| Previous | Sink the Buccaneer |
| Next | Welcome to Panau (first mission of Just Cause 2) |
| Faction | The Agency |
| Location | Isla Dominio |
Taking Out The Garbage is the final storyline mission in Just Cause (1).
As the largest mission in the game, it has been divided into 3 parts:
- "Taking out the garbage Vol. 1"
- "Taking out the garbage Vol. 2"
- "Taking out the garbage Vol. 3"
You can save the game after each part.
Vol. 1[]
Mission information from the PDA: "President Mendoza has retreated to his heavily fortified private island. Infiltrate the island, crush the opposition plus find and terminate the president. The guerrillas are standing by to aid you, but are held back by the islands superior defenses. You might want to find a way to even out the odds."
Rico is flown half way to Isla Dominio (south-east corner of the map) in an unmarked Agency HH-22 Savior where he'll have to parachute out. The Agency provides a Jaeger 5FJ 7 as the next transport. You'll have to get to the island and then to the front yard of the president's palace, on the island.
Sounds easy? It would be, but no other mission has as many enemy soldiers attacking Rico. The Guerrilla soldiers will cancel a lot of them out, but it's still relatively difficult.
Once you're at the palace, you'll have to destroy the automatic surface to air missile launchers and a unique unmarked Ballard M5B1 Scout.
As soon as the Ballard M5B1 Scout is destroyed, a cut scene starts where Salvador Mendoza flees by helicopter to a nearby launch site.
Rico has to get to the top of the small mountain to get to Salvador Mendoza. On your way up, you'll be informed that he already escaped. You won't even see him leave. Next you'll have to stop some nuclear missiles from being launched, which you won't be able to do either, because they'll take off before you'll get to them.
This part of the mission is just about running around a lot, under enemy fire.
Eventually, you'll be allowed to parachute your way to the military airfield at the south-east corner of the island, where you will be allowed to save the game.
Tips[]
- It's not recommended to use the Jaeger 5FJ 7, as hostile Pequod - Harpoon PC 350s would simply tear it apart. Order the Bald Eagle Persuader via heavy drop instead.
- The easiest way to do this part of the mission is to go to a military base and get a jet fighter, right after the first cut scene. The nearest is the "Don Velasco air base" (just east of Esperito City) that has a couple of Ulysses-McCoy Redclouds.
- If getting a jet fighter sounds like a major detour, then you should consider using the Protec Grappler G3 to hijack an attack helicopter. Make sure you don't take a police Huerta PA51 Aztek, as it's armed with only a machine gun and wouldn't be able to protect itself from the missile-armed attack helicopters. Conveniently there are Guerrilla Jackson Z-19 Skreemer helicopters attacking Montano Cartel boats and government boats in the area. The Black Hand also sends some Delta MAH-15 Chimaeras after you as soon as you get to the island.
- It's definitely recommended to save the game when you have the chance, because it will restore your health. But be warned: If you've obtained an aircraft, then saving will spawn you on the ground, without it.
- Try not to resort to using ground vehicles on your way up the mountain, as those would be easily destroyed. Instead, try to use the grappling hook to hijack an attack helicopter. Again, make sure you get a missile-armed helicopter to be able to fight enemy helicopters when needed.
- Any assault rifle, or rocket launcher, would be useful here. Not only to fend off infantry, as a Black Hand Delta MAH-15 Chimaera will most likely be shooting at you.
Gallery[]
")
")
")
Vol. 2[]
Mission information from the PDA: "The president has launched his tactical missiles. Use the jet to catch up with them before the reach scram-speed. The Black Hand may have jets too, so be careful of any pursuers."
- "You've gotta take out those missiles before they go into "SCRAM" mode!" - Tom Sheldon quickly informing Rico of what he must do in this part of the mission.
Tom Sheldon will provide an Agency Rage-Johnston F6 Comet. You'll have to use it to chase the nuclear missiles and shoot them down before they go into "scram" (supersonic combustion ramjet) mode and accelerate away. If they do that, the mission will fail.
As soon as you've finished destroying the three nuclear missiles, you can save the game.
Tips[]
- When chasing the nuclear missiles, don't bother trying to get close enough to them to see them clearly since that's impossible. Just make sure you can lock onto them and fire as many missiles as possible.
- Save the game. This will fully heal Rico and the plane.
Vol. 3[]
Mission information from the PDA: "Kill President Mendoza."
Now Rico has to fly to the Mendoza International Airport. You'll be chased by several Black Hand Ulysses-McCoy Redclouds all the way there. And of course they'll try to shoot you down with their missiles. Generally, don't try to dogfight them as that would waste time from the chase.
Once you get close enough to the airport, you'll see the President's Plane taking off.
You'll have to enter it. But to do that, you have to fly as close to the president's plane as you can without crashing into it.
You might still be chased by 2 Ulysses-McCoy Redclouds, if they haven't given up yet, but they should be ignorable.
Keep an eye on the distance at the top right corner of the screen. Once you're close enough, you'll see instructions on screen about what button to press to enter the plane. Considering the speed difference between the planes, you'll have about 1 second to press the right button, before it's too late. The exact button depends on the console you're using.
After entering the plane by Grappling or jumping to its Stunt position, you'll find yourself in the cargo compartment of the plane. There you'll have to fight some green-capped Black Hand soldiers that Tom for some reason refers to as "the Black Hand's finest". After you're done with them, you can enter the next room, where you'll meet none other than Salvador Mendoza himself. Mendoza taunts Rico while quoting, "Air Force One" and then he will jump out of the plane.
You have to catch up to him in the air while skydiving. When you get to him, you'll have to plant an explosive device on his back and detonate it from a distance (the detonation is automatic, so no need to try to trigger it yourself). If you fail to do this, Mendoza will at some point open his parachute and escape. A large black submarine can be seen in the distance in that case, implying that Mendoza escaped.
- "You see what happens when you make me angry?" - Rico speaking to Mendoza just before Mendoza is blown up.
Tips[]
- Don't waste time on trying to outmaneuver and shoot down the Ulysses-McCoy Redclouds. Instead try to just stay out of the way of their missiles. If you shoot them down, more will spawn.
- Take cover behind the wooden boxes during the shoot-out on the President's Plane. The Black Hand escorts are using Fxleisher AR-5 Blizzards, so be careful.
- If you miss Mendoza while chasing him in the end, you can change Rico's pose to make him slow down and try again. You can do this about 3 times before you run out of time.
- You don't have to actually be in contact with Mendoza to plant the explosive device. Abut 0.5 m (1.5 ft) is close enough.
Gallery[]
")
")
.png "Excelsior (front, at distance).png (925 KB)")
.png "Excelsior (front, airforce has accidentally hit it).png (1.25 MB)")
.png "Excelsior (right front corner).png (884 KB)")
.png "Excelsior (right side, below the wing).png (805 KB)")
.png "Excelsior (pilot cabin interior).png (979 KB)")
")
.jpg "Mendoza(1).jpg (7 KB)")
")
.png "Taking Out The Garbage (submarine seen from above).png (432 KB)")
.png "Taking Out The Garbage (submarine right front corner, 2 angles).png (699 KB)")
Trivia[]
General:
- There are rare vehicles found in this mission that are either extremely rare or cannot be seen elsewhere:
- Volume 1 is the only time you will find Guerrilla Jackson Z-19 Skreemers outside of sidemissions.
- Volume 1 is the only time you will find the Agency marked Jaeger 5FJ 7 or even the unmarked HH-22 Savior.
- Volume 1 also contains a semi-unique, unmarked Ballard M5B1 Scout (which has only one permanent spawn point) that carries the Black Hand Tank Commander. On that note, the vehicle cannot be hijacked. Attempting to do so results in the game saying "CANNOT USE VEHICLE".
- Volume 2 is the second and last time you will find an Agency Rage-Johnston F6 Comet and the only occasion where it is usable. Notably, Tom and Maria can both sit inside.
- Volume 2 also features around 5 Black Hand Ulysses-McCoy Redclouds during the chase. While they appear in heat sometimes, it is still a relatively rare vehicle. Be mindful of the missiles, as while the Comet is durable, it cannot last forever if struck repeatedly.
- Volume 3 is the only time you can find the Excelsior plane.
- This mission is the game's final mission. It is also the mission where Salvador Mendoza is defeated and killed. In future games in the series, the final mission usually has a final boss fight where the player has to fight the main antagonist as well. These include:
- A Just Cause - Final mission of Just Cause 2 and boss fight.
- Son of Medici - Final mission of Just Cause 3 and boss fight.
- Operation Illapa - Final mission in JC4. No boss fight, but the main antagonist is still defeated.
Vol. 1:
- This is one of only two times you will find Mendoza's Huerta PA51 Aztek.
- This is the only time you will find Isla Dominio in a state of chaos. In normal gameplay, just one faction occupies it - Black Hand before, and the Guerrillas thereafter. Localized conflicts with the Montano Cartel before and after will occur.
Vol. 2:
- Depending upon the player's opinion, this might be the penultimate mission in the game.
- You will not need a fighter jet for any subsequent storyline missions in the Just Cause Game Series until Rico and the Rose in Just Cause 3.
Vol. 3:
- The only enemies that the player has to kill during this mission (other than Mendoza) are "the Black Hand's finest", or several green-capped soldiers wielding Fleisher AR-5 Blizzards. Until Just Cause 3, this mission is the only time you will fight aboard a plane.
- There is an exclusive soundtrack played during the freefall chase.
Missions in Just Cause (1) | |
|---|---|
| The Agency (storyline missions) | Devil's Drop Zone · Breakout · Freedom Fighters · The San Esperito Connection · Test of Loyalty · Good Cop, Bad Cop · Some Like it Hotter · Brothers in Arms · River of Blood · Field of Dreams · Broadcast News · Love is in the Air · I've Got the Power · Guadalicano Choo Choo · Some Enchanted Evening · Streets of Fire · Dismissed Without Honors · Sink the Buccaneer · Taking Out The Garbage (vol. 1, 2, 3) |
| Side missions | |