mNo edit summary |
(Undo revision 156855 by SUPER4geditTANK (talk)) |
||
| Line 29: | Line 29: | ||
===Get to the power plant=== |
===Get to the power plant=== |
||
| − | You will not be provided with any vehicles, but you are free to use any vehicle. The best choice is a well armed helicopter, like the [[Jackson Z-19 Skreemer]] from the [[Just Cause Safehouses#Rioja 04 Eagles nest|"Rioja 04 Eagles Nest" safehouse]] . Whatever vehicle you use, make sure it's not a ground vehicle |
+ | You will not be provided with any vehicles, but you are free to use any vehicle. The best choice is a well armed helicopter, like the [[Jackson Z-19 Skreemer]] from the [[Just Cause Safehouses#Rioja 04 Eagles nest|"Rioja 04 Eagles Nest" safehouse]] . Whatever vehicle you use, make sure it's not a ground vehicle. |
===Blow up the plant=== |
===Blow up the plant=== |
||
| − | If you |
+ | If you used the recommended helicopter, you will be able to blow the plant up with the missiles and immediately move on to the next part of the mission. If not, you will have to blow things up on foot. |
| − | Either way, watch out for the government [[Walker AH-16 Hammerbolt]] attack helicopter and remember: as soon as you destroy it, they'll send another one, but you'll have a few seconds of free time. So choose your moments wisely, if you're going to be shooting it down with any [[:Category:Just Cause Weapons|carried rocket-launcher]]. |
+ | Either way, watch out for the government [[Walker AH-16 Hammerbolt]] attack helicopter and remember: as soon as you destroy it, they'll send another one, but you'll have a few seconds of free time. So choose your moments wisely, if you're going to be shooting it down with any [[:Category:Just Cause Weapons|carried rocket-launcher]]. You might even see some [[Meister LAV 4 series 2]] armoured personnel carriers, but don't bother [[Hijacking]] any, because they have thin armour and no weapons. |
| − | |||
| − | You might even see some [[Meister LAV 4 series 2]] armoured personnel carriers, but don't bother [[Hijacking]] any, because they have thin armour and no weapons. |
||
The first thing to blow up are 3 large fuel silos. Use the provided stairs to get up to the control panel and set a remotely triggered explosive. Alternatively, you could throw a [[Grenade]], but in that case run away immediately and jump off that elevated ramp. The explosion will be pretty powerful. |
The first thing to blow up are 3 large fuel silos. Use the provided stairs to get up to the control panel and set a remotely triggered explosive. Alternatively, you could throw a [[Grenade]], but in that case run away immediately and jump off that elevated ramp. The explosion will be pretty powerful. |
||
| Line 46: | Line 44: | ||
===Investigate the facility in the south-east=== |
===Investigate the facility in the south-east=== |
||
The in-game mission objective will confusingly call this the western part of the island. |
The in-game mission objective will confusingly call this the western part of the island. |
||
| − | If you're using the helicopter, then be warned: You might easily get shot down at this point |
+ | If you're using the helicopter, then be warned: You might easily get shot down at this point. |
| − | If you're on foot, then just run through the forest, staying away from roads. |
+ | If you're on foot, then just run through the forest, staying away from roads. The single helicopter is nothing to worry about, as it will miss almost all shots. But if you use a ground vehicle, it'll use missiles. |
When you get to about 150 m of the target, another [[Walker AH-16 Hammerbolt]] will show up. Now it is most likely easily seen for most people that this facility is a [[Nuclear Reactor]]. |
When you get to about 150 m of the target, another [[Walker AH-16 Hammerbolt]] will show up. Now it is most likely easily seen for most people that this facility is a [[Nuclear Reactor]]. |
||
| − | Rico will call the others and tell them that [[Salvador Mendoza|Mendoza]] is |
+ | Rico will call the others and tell them that [[Salvador Mendoza|Mendoza]] is making nuclear bombs there, for his missiles. |
| + | |||
| + | Get to the back of the reactor building to get to the stairs. Climb up and get to the final control panel. You'll have to destroy the reactor cooling system to cause a melt-down and blow it up. It would be wise to use the remotely triggered explosives. Do not blow it up until you've gotten off the building and back to about where the stairs begin. Blowing it up will start a 60 second countdown. |
||
| + | |||
| + | ===Get away from there=== |
||
| + | A [[Yamada 37-14 Vaquero]] motorcycle will have spawned at the stairs. Ignore the gunfire and get on. Ride it straight off the edge of the nearest cliff. Get off mid-flight and deploy the parachute. |
||
| + | |||
| + | The target will be at the next island to the south, but you won't make it. You just have to be high enough and far enough. |
||
| + | |||
| + | There will be a cut-scene with a massive explosion. The fireball will be at least 2 km across, indicating that it must have been a nuclear explosion. |
||
| + | After the mission, Rico will spawn on that smaller island. |
||
| − | If you've still got the armed chopper, use it. Shower the area with rockets, shoot down anything that flies, and then quickly make your getaway. 60 seconds is enough for the chopper to move far enough. If you do not have one, use the triggered exlplosives and only detonate them once you've got to the bottom of the stairs. There should be a motorbike. Trigger the explosives, then use the motorcycle to jump off the mountain and deploy your parachute. You will never reach that island, but just getting far enough will be sufficient for mission completion. |
||
| + | Alternatively you could hijack the [[Walker AH-16 Hammerbolt]] and fly it out of there. |
||
| − | A cut-scene appears, covering the explosion on the facility. Rico then spawns on a beach, and along with the exact same helicopter he used in the mission, if he had any. |
||
===Alternate strategy=== |
===Alternate strategy=== |
||
| + | If Rico approaches the nuclear plant end of the island before blowing up the power plant, Rico will message Kane and Tom and the [[#Investigate the facility in the south-east|Investigate the facility]] part of the mission will automatically activate. The mission as a whole can be completed successfully by achieving the objectives of this second part alone. As you can imagine, this can save a lot of time. It is also realistic, other than the discrepancies regarding nuclear power plants noted in the [[#Trivia|Trivia]] section; the power plant would be blown up by an explosion that consumed the island, although the explosion itself is unrealistic. With a helicopter or [[Mako Hammerhead]] at the ridge behind the nuclear reactor, the reactor can be blown up with a single shot; the escape takes longer, since Rico starts further away from the motorcycle escape route, but it can be done. |
||
| − | The first part of the mission can be skipped if the facility is discovered early, even when the initial objectives are active. They will be removed and the mission proceeds as normal. Primarily a chopper can easily do so, and it saves much time, as well as reducing the odds of the chopper being shot down by missiles, by reducing it's exposure to enemy missiles. |
||
==Trivia== |
==Trivia== |
||
*The name of the mission might be a reference to the song "[http://www.youtube.com/watch?v=_BRv9wGf5pk The Power]". It's an electronic pop song by the German music group "Snap!" from their album "World Power" and was released in January 1990. |
*The name of the mission might be a reference to the song "[http://www.youtube.com/watch?v=_BRv9wGf5pk The Power]". It's an electronic pop song by the German music group "Snap!" from their album "World Power" and was released in January 1990. |
||
| ⚫ | |||
| − | *The alternate method does makes sense, since the nuclear plant seems to be a priority, and that taking it out will also destroy the other facilities anyways. |
||
| ⚫ | |||
| ⚫ | |||
| ⚫ | |||
**An explosion could only happen if the right type of nuclear fuel would melt and flow to the bottom of the reactor, where its total mass would exceed the [http://en.wikipedia.org/wiki/Critical_mass critical mass], resulting in an explosion. This can not happen, because the [http://en.wikipedia.org/wiki/Corium_(nuclear_reactor) Corium "lava"] would mostly consist of the other materials that used to compose the inside of the reactor. |
**An explosion could only happen if the right type of nuclear fuel would melt and flow to the bottom of the reactor, where its total mass would exceed the [http://en.wikipedia.org/wiki/Critical_mass critical mass], resulting in an explosion. This can not happen, because the [http://en.wikipedia.org/wiki/Corium_(nuclear_reactor) Corium "lava"] would mostly consist of the other materials that used to compose the inside of the reactor. |
||
**Nuclear fuel does not explode too easily, even when it reaches/exceeds the critical mass. At best, it could result in what's called "[http://en.wikipedia.org/wiki/Fizzle_(nuclear_test) fizzle]". This is an event where there is a small nuclear explosion, but most of the nuclear fuel would vaporize before exploding. |
**Nuclear fuel does not explode too easily, even when it reaches/exceeds the critical mass. At best, it could result in what's called "[http://en.wikipedia.org/wiki/Fizzle_(nuclear_test) fizzle]". This is an event where there is a small nuclear explosion, but most of the nuclear fuel would vaporize before exploding. |
||
*This is the only mission starting with the letter "I" in this game. |
*This is the only mission starting with the letter "I" in this game. |
||
| − | *This is the only time you can hear a siren at San Pedro. Even during normal gameplay there isn't a siren, although it might not be necessary |
+ | *This is the only time you can hear a siren at San Pedro. Even during normal gameplay there isn't a siren, although it might not be necessary, when there are Guerrilla vehicles everywhere (literally). |
| − | *This is the only |
+ | *This is the only mission where enemy [[Walker AH-16 Hammerbolt]]s are featured. A [[Black Hand]] version can also [[Talk:Walker AH-16 Hammerbolt|very rarely be encountered]] in place of the [[San Esperito Military|Military]] versions. |
| − | *Similar to the mission [[Test of Loyalty]], the objectives that need to be destroyed will do so when they detect an explosion close enough to them. This means that they can be destroyed |
+ | *Similar to the mission [[Test of Loyalty]], the objectives that need to be destroyed will do so when they detect an explosion close enough to them. This means that they can be destroyed with any explosive weapon, like a [[Mako Ocra]], attack helicopter, or even a [[Ballard series armored vehicles|Ballard series vehicle]]. |
| + | **In other words, they can be destroyed with a explosion near them. |
||
*This is the first time you will find Guerrillas and soldiers on this island at once. After this mission, they're still there (for eternity). |
*This is the first time you will find Guerrillas and soldiers on this island at once. After this mission, they're still there (for eternity). |
||
*This is one of the few missions where there aren't any [[rare vehicles]]. |
*This is one of the few missions where there aren't any [[rare vehicles]]. |
||
Revision as of 13:20, 22 February 2020
 Bolo finds this pleasing, but she would like more. |
| I've Got the Power | |
|---|---|
 Blowing the plant up with a helicopter. | |
| Story Mission | |
| Previous | Love is in the Air |
| Next | Guadalicano Choo Choo |
| Faction | Agency |
| Location | San Pedro power plant Nuclear Reactor |
| Rewards | |
| Destabilized Provinces | Isla San Cristobal, Provincia del Rosario |
I've Got the Power is the thirteenth storyline mission in Just Cause (1).
Introduction
Mission information from the PDA: Mendoza's grip on the islands is starting to crumble. Most of San Esperito's electricity comes from the power plant in San Pedro. If it was to be destroyed, the president's power over the people would diminish.
Rico is briefed at a beach and told that most of the electric power in San Esperito is provided by the San Pedro power plant, at Isla San Cristobal. Rico has to go and destroy it.
Whatever time you start the mission, the in-game time will reset to night.
Walkthrough
Notice that there's Triggered Explosives near the mission trigger. Take them with you. Use the gallery below for reference with the action. Note that the mission can be cut in half; if interested see the Alternate strategy section.
Get to the power plant
You will not be provided with any vehicles, but you are free to use any vehicle. The best choice is a well armed helicopter, like the Jackson Z-19 Skreemer from the "Rioja 04 Eagles Nest" safehouse . Whatever vehicle you use, make sure it's not a ground vehicle.
Blow up the plant
If you used the recommended helicopter, you will be able to blow the plant up with the missiles and immediately move on to the next part of the mission. If not, you will have to blow things up on foot.
Either way, watch out for the government Walker AH-16 Hammerbolt attack helicopter and remember: as soon as you destroy it, they'll send another one, but you'll have a few seconds of free time. So choose your moments wisely, if you're going to be shooting it down with any carried rocket-launcher. You might even see some Meister LAV 4 series 2 armoured personnel carriers, but don't bother Hijacking any, because they have thin armour and no weapons.
The first thing to blow up are 3 large fuel silos. Use the provided stairs to get up to the control panel and set a remotely triggered explosive. Alternatively, you could throw a Grenade, but in that case run away immediately and jump off that elevated ramp. The explosion will be pretty powerful.
The next control panel to blow up is right across the street. A simple grenade is enough - no need to stand still under fire.
The last control panel is on top of a chimney. This is the most difficult one to get to on foot. Climb the stairs to the top and then up the ladder to the control panel. This would be a good time to shoot down the helicopter. Deploy a remotely Triggered Explosive and get back down. Note that you're not high enough to use the parachute. You can hide under that same building while blowing up the control panel. Just stay away from the chimneys.
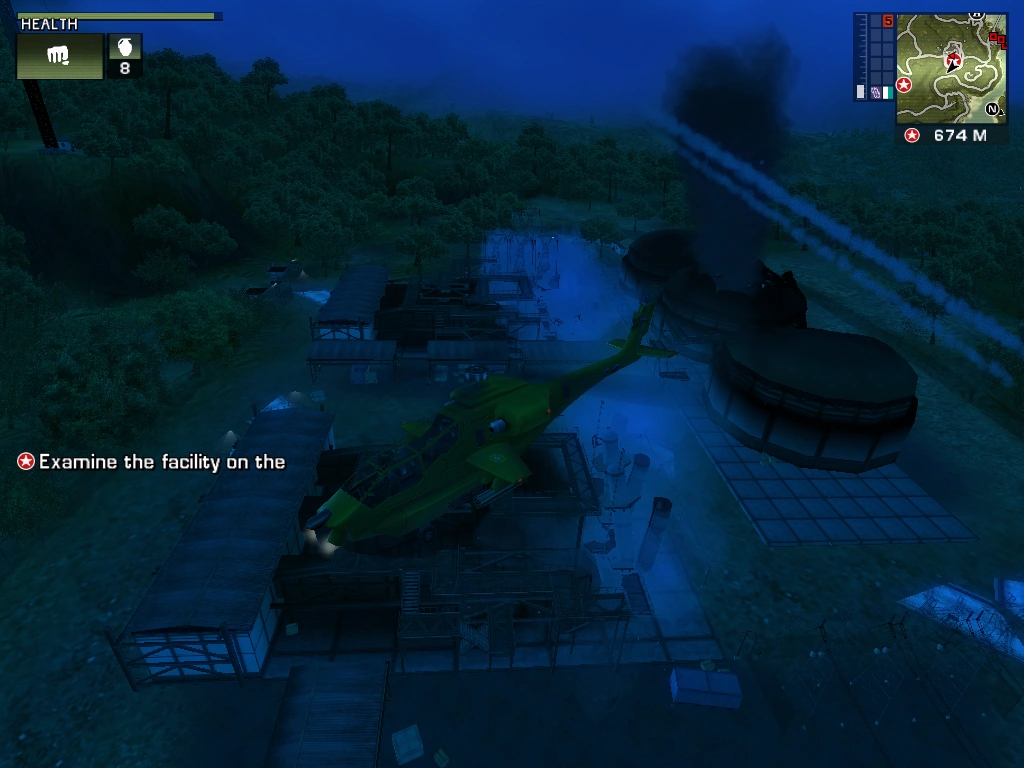
Investigate the facility in the south-east
The in-game mission objective will confusingly call this the western part of the island. If you're using the helicopter, then be warned: You might easily get shot down at this point.
If you're on foot, then just run through the forest, staying away from roads. The single helicopter is nothing to worry about, as it will miss almost all shots. But if you use a ground vehicle, it'll use missiles.
When you get to about 150 m of the target, another Walker AH-16 Hammerbolt will show up. Now it is most likely easily seen for most people that this facility is a Nuclear Reactor.
Rico will call the others and tell them that Mendoza is making nuclear bombs there, for his missiles.
Get to the back of the reactor building to get to the stairs. Climb up and get to the final control panel. You'll have to destroy the reactor cooling system to cause a melt-down and blow it up. It would be wise to use the remotely triggered explosives. Do not blow it up until you've gotten off the building and back to about where the stairs begin. Blowing it up will start a 60 second countdown.
Get away from there
A Yamada 37-14 Vaquero motorcycle will have spawned at the stairs. Ignore the gunfire and get on. Ride it straight off the edge of the nearest cliff. Get off mid-flight and deploy the parachute.
The target will be at the next island to the south, but you won't make it. You just have to be high enough and far enough.
There will be a cut-scene with a massive explosion. The fireball will be at least 2 km across, indicating that it must have been a nuclear explosion.
After the mission, Rico will spawn on that smaller island.
Alternatively you could hijack the Walker AH-16 Hammerbolt and fly it out of there.
Alternate strategy
If Rico approaches the nuclear plant end of the island before blowing up the power plant, Rico will message Kane and Tom and the Investigate the facility part of the mission will automatically activate. The mission as a whole can be completed successfully by achieving the objectives of this second part alone. As you can imagine, this can save a lot of time. It is also realistic, other than the discrepancies regarding nuclear power plants noted in the Trivia section; the power plant would be blown up by an explosion that consumed the island, although the explosion itself is unrealistic. With a helicopter or Mako Hammerhead at the ridge behind the nuclear reactor, the reactor can be blown up with a single shot; the escape takes longer, since Rico starts further away from the motorcycle escape route, but it can be done.
Trivia
- The name of the mission might be a reference to the song "The Power". It's an electronic pop song by the German music group "Snap!" from their album "World Power" and was released in January 1990.
- A nuclear reactor meltdown would in reality not explode in the same way as a bomb.
- Such a reaction needs larger amounts of highly reactive and unstable isotopes, like Uranium-235. Nuclear fuel used in reactors usually has very low amounts of these isotopes, unless this reactor was used to produce fuel for nuclear bombs.
- An explosion could only happen if the right type of nuclear fuel would melt and flow to the bottom of the reactor, where its total mass would exceed the critical mass, resulting in an explosion. This can not happen, because the Corium "lava" would mostly consist of the other materials that used to compose the inside of the reactor.
- Nuclear fuel does not explode too easily, even when it reaches/exceeds the critical mass. At best, it could result in what's called "fizzle". This is an event where there is a small nuclear explosion, but most of the nuclear fuel would vaporize before exploding.
- This is the only mission starting with the letter "I" in this game.
- This is the only time you can hear a siren at San Pedro. Even during normal gameplay there isn't a siren, although it might not be necessary, when there are Guerrilla vehicles everywhere (literally).
- This is the only mission where enemy Walker AH-16 Hammerbolts are featured. A Black Hand version can also very rarely be encountered in place of the Military versions.
- Similar to the mission Test of Loyalty, the objectives that need to be destroyed will do so when they detect an explosion close enough to them. This means that they can be destroyed with any explosive weapon, like a Mako Ocra, attack helicopter, or even a Ballard series vehicle.
- In other words, they can be destroyed with a explosion near them.
- This is the first time you will find Guerrillas and soldiers on this island at once. After this mission, they're still there (for eternity).
- This is one of the few missions where there aren't any rare vehicles.
Gallery
")
")
")
")
")
")
")
Missions in Just Cause (1) | |
|---|---|
| The Agency (storyline missions) | Devil's Drop Zone · Breakout · Freedom Fighters · The San Esperito Connection · Test of Loyalty · Good Cop, Bad Cop · Some Like it Hotter · Brothers in Arms · River of Blood · Field of Dreams · Broadcast News · Love is in the Air · I've Got the Power · Guadalicano Choo Choo · Some Enchanted Evening · Streets of Fire · Dismissed Without Honors · Sink the Buccaneer · Taking Out The Garbage (vol. 1, 2, 3) |
| Side missions | |