 This article may seem complete to the untrained eye, but the gaps in information are still large enough for this elite team of Panauan Ninjas to hide inside of. |
This article is about the race challenges in the Just Cause game series.
In JC1 they are called races, while in JC2 they are called challenges. In JC3 they are sorted into feats and challenges in the games menu, and in JC4 this wiki knows of feats.
See Also: Race Videos
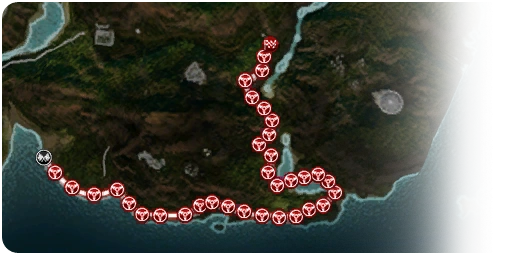
A map of the race, "The Forbidden Coast".
Just Cause


A Shimizu Tumbleweed at the end of Deliverance.
Just Cause (1) has 9 races. They are hosted by the Rioja Cartel. The races in San Esperito are checkpoint races, without any competitors, just like the races in Panau.
The game tells you that you can use any land vehicle for a land race; any aircraft for an air race and any boat for a water race. However, all races can be started with any vehicle.
This means that most races can be completed with a helicopter. The Agency Whiptail Gyrocopter is the best one for the job, because it's the smallest. "Hang Ten" can be completed with a Fixed-wing aircraft, but fast helicopters such as the Delta MAH-15 Chimaera work too.
The race names and your best times are listed in the PDA statistics.
| Race Name | Location | Provided Vehicle | Special Notes |
|---|---|---|---|
| Deliverance | In Isla de la Asuncion province. West of the Rioja 01 "Buena fortuna" safehouse. At an EL gas gas station. | Hurst Buckaroo | At one point there's an unusual obstacle on the road, with some logs and a Scando Track Loader Extreme. |
| Freakwave | In Provincia de Rio Negro province. Across the lake from Rioja 02 "Paradiso bay" safehouse. At a dock in the southern part of the town Paradiso Bay. | Triereme - RC Athena | This is the only boat race. |
| Mount Doom | In the Los Hidalgos province. Right across the road from the Agency 03 "Camp farmhouse" safehouse. Behind an EL gas gas station. | Hurst Dagger | This race can be difficult because of all the traffic on the narrow road. Stay calm and patient. Try different sports cars and always save them at the nearst safehouse first (to save time after failing). |
| The Endless Summer | In the Encarnacion province. To the east of Nuevo Estocolmo. At the Casa Isabella cartel villa. | Yamada 37-14 Vaquero | The race takes place at a purpose-built obstacle course which contains muliple jump ramps and a functioning parked Pankhurst Bus Tap Tap, which has to be jumped. |
| Hang Ten | In the Costa Verde province. To the east of the Guerrlla 20 "Campo pueblo" safehouse. At an unmarked civilian airfield. | Huerta SPA Ocelot |
|
| Blood and Asphalt | In the Costa Verde province. To the south-east of the Guerrlla 20 "Campo pueblo" safehouse and to the south of the race "Hang Ten". In a small unmarked settlement. | Hurst Dagger | The end of the race is at a cliff, so you may jump out before going over, or you may Parachute your way down, but stopping would cost time from the race. |
| Beach Head | In the Provincia de Cordoba province. To the south-west of the Guerrlla 27 "Campo Halcon" safehouse. | Stinger GP |
|
| Phantom Riders | In Esperito City - North. West of the Rioja 07 "Motor city" safehouse. At an EL gas gas station. | Rossi 866 Corral | There's a wooden stunt ramp in this race, which can't be seen outside of the race. Do not make this jump at maximum speed, or the car will stop during the landng and you'll lose a few seconds. Don't go too slow, or the car will crash into the landing ramp and you'll have to go around it. This may take practice. |
| Another Saturday Night | In Esperito City - South. Near the Giant statue of Salvador Mendoza. At a "Supermercado" store. | There can be several vehicles parked at the store parking lot, but only the Chevalier Street Bird De Luxe is always there. | This track goes through a park and over a small hill. There's a collectable item on top of that hill. The item is from the collect mission "Red Eyes". |
Description and tips for Just Cause 2
Provided vehicles

One of the checkpoints being passed.


.jpg)
Map of the race "Desert Dash" and the location of Bandar Gereja Gurun.
Some races are supposed to be done by Parachute and Grappler, but Rico is usually provided with a vehicle. None of the vehicles are unique in their shape, but they are all in a unique red color that can't be seen anywhere else. Despite being provided with a vehicle, you are free to use any vehicle of a certain type, specified at the race start when it shows you the route, either land, sea or air. You can use a helicopter for all races despite the in-game message telling you that you must use a land/sea/air vehicle.
Races
None of the races have any other competitors. You just have to get through all the checkpoints in a short enough time.
You can fail a race if you drive too slowly, or if you just drive away from the mission area. But you will never fail a race for destroying your vehicle. This allows you to get a new vehicle, either by Hijacking the nearest convenient one, or by buying one from the Black Market (which isn't recommended considering you will probably spend more on a vehicle than what the race pays- $20,000). Getting a new vehicle isn't recommended if you're trying to beat your old best time.
Checkpoints
Checkpoints are your objective throughout any race while the amount of checkpoints varies depending on the race being run. When you near a checkpoint (in your vehicle or on foot), they will burst into (harmless) flames to help add visibility. When passing through a checkpoint, you will get 00:10:00 (10 seconds) added to your remaining time (the exception being The Raya Race, which adds 30 seconds because of it's enormous length). The checkpoint ring explodes as you pass through it, but this causes no damage to you or your vehicles. In some races there are optional "bonus" checkpoints that will appear between a few of the mandatory numbered checkpoints, these will require you to take a more difficult line (e.g. under a bridge for aircraft, over a jump or parachuting over a bridge for cars), and will reward you with 00:20:00 (20 seconds) added to your time.
Awards
Rico gets $20,000 for every completed race, even if the race has been finished before, or if he doesn't beat his previous best time. This is a source of infinite money.
The game also lets the player keep the vehicle, whether they beat the race or not.
Tips
- Spend the time before you go through the start point to get a good vehicle, not necessarily the provided one - e.g. for road races it might be better to hijack a random passing car than to use the provided one.
- A helicopter (especially a Rowlinson K22) will usually be easier than the provided aircraft for aerial races. Just make sure to keep going forward towards the checkpoint especially when they are farther apart, since choppers are not as fast as planes.
- Road races in Panau City are easier at night, when there isn't so much traffic.
- Do try the races with the provided vehicle at least once, they are chosen to make the race more challenging/interesting/fun!
- Certain races are easier to do when military bases that they pass through are completed.
- Races, especially those with aircraft, may often show locations of unmarked settlements, Gas Stations, Pipelines, Resource Items, etc.
List of challenges in Just Cause 2
Land
| Name | Difficulty (in stars) | Location (PDA map) | Vehicle |
|---|---|---|---|
| Baby's Cradle | 2 | X:22280; Y:27150 | Shimuzu Tracline |
| Backdoor Breaking | 2 | X:1010; Y:13215 - Panau City Docks District | Tuk-Tuk Laa |
| Backstage Pass | 2 | X:3490; Y:12365 | Tuk Tuk Laa |
| Barat Bridge Insanity | 3 | Panau City Park District | Titus ZJ |
| The Centrifuge | 3 | X:23310; Y:16780 | Chepachet PVD |
| Crossing Lanes | 2 | X:22250; Y:22540 | Stinger Dunebug 84 |
| Downtown Highway | 1 | X:3475; Y:15290 Panau City Residential District | Mancini Cavallo 1001 |
| Emergency Call | 2 | X:6460; Y:14080 | Kenwall Heavy Rescue |
| Financial District Frenzy | 1 | X:6480; Y:13150 | Titus ZJ |
| The Forbidden Coast | 2 | X:29650; Y:31250 | Chepachet PVD |
| Frozen Hell | 3 | X:23140; Y:14450 | Chepachet PVD |
| Gila Pangkat Route | 3 | X:15895; Y:11925 - Bandar Besar | Stinger Dunebug 84 |
| Gunung Kudus Slackcountry | 2 | X:23580; Y:15250 | Chevalier Express HT |
| Gunung Merah Beach Race | 2 | X:10070; Y:29210 | Stinger Dunebug 84 |
| Gunung Raya Downhill | 2 | X:21845; Y:11795 | Dalton N90 |
| Kampung Nur Cahaya Road | 2 | X:10990; Y:19220 | Garret Traver-Z |
| Ketam Besar Trespass | 3 | X:19485; Y:26490 | MV V880 |
| Kicked to the Curb | 2 | X:660; Y:13625 | SV-1003 Raider |
| Left for Death | 2 | X:20525; Y:20170 | Stinger Dunebug 84 |
| Panau City Speed Freak | 1 | X:1060; Y:13165 - Panau City Docks District | Garret Traver-Z |
| Panau International | 2 | Panau International Airport | Titus ZJ |
| Parks District Bugrun | 2 | X:4425; Y:11305 | Stinger Dunebug 84 |
| Pulau Berapi Refinery Run | 2 | X:14855; Y:17860 | Stinger Dunebug 84 |
| Pulau Kait Speedrun | 1 | X:24260; Y:3770 | Titus ZJ |
| Pulau Tasik Offroad | 1 | X:15705; Y:24125 | Shimuzu Tracline |
| Pelaut Highway Run | 1 | X:27165; Y:7610 | Titus ZJ |
| Rajang Highway | 2 | X:11560; Y:21820 | Makoto MZ 250 |
| The Raya Race | 3 | X:26935; Y:11325 | Mancini Cavallo 1001 |
| Red Canyon Race | 1 | X:6390; Y:26930 | Stinger Dunebug 84 |
| Right up your Alley | 2 | X:2875; Y:14750 | Tuk Tuk Laa |
| Selatan Route | 2 | X:26565; Y:29500 | Garret Traver-Z |
| Slopes of Gunung Kudus | 3 | X:23510; Y:13335 | Maddox FVA 45 |
| South City Speeding | 2 | Panau City Residential District | Titus ZJ |
| Test of Kenjantanan | 2 | X:13760; Y:27400 | Stinger Dunebug 84 |
| Utara Bridge Insanity | 3 | X:5320; Y:12670 | Mancini Cavallo 1001 |
| West Tanah Raya Highway Run | 2 | X:13875; Y:10980 | Mancini Cavallo 1001 |
Airplane
| Name | Difficulty (in stars) | Location (PDA map) | Vehicle |
|---|---|---|---|
| Aces High | 2 | X:6310; Y:13350 | Peek Airhawk 225 |
| Berapi Island | 3 | Kampung Tujuh Telaga | Peek Airhawk 225 |
| Bridge of Death | 3 | X:5090; Y:14750 | Peek Airhawk 225 |
| Casino Finale | 3 | X:17335; Y:21570 | Peek Airhawk 225 |
| Dataran Tinggi Tour | 1 | X:17045; Y:4820 | Cassius 192 |
| Desert Dash | 1 | X:6520; Y:25890 | Peek Airhawk 225 |
| Gurun Canyon Run | 1 | X:9440; Y:19620 | Peek Airhawk 225 |
| Gunung Gila Pangkat Crossing | 1 | X:17325; Y:9515 | Peek Airhawk 225 |
| Harbormaster | 1 | X:1590; Y:13965 Pelabuhan Saudagar | Peek Airhawk 225 |
| Highway to Heaven | 3 | X:11970; Y:10380 | Pell Silverbolt 6 |
| Island Hopping | 2 | X:25885; Y:24070 | Si-47 Leopard |
| Jurang Rajang Crossing | 1 | X:10625; Y:18670 | Peek Airhawk 225 |
| Kepulauan Valley Run | 2 | X:18580; Y:23420 | Peek Airhawk 225 |
| Nipah Valley Roundabout | 3 | X:13620; Y:4440 | Peek Airhawk 225 |
| Panau City Bridge Ballet | 3 | Panau City Residential District | Peek Airhawk 225 |
| Panau City Parks Challenge | 3 | Panau City Park District | Peek Airhawk 225 |
| PAN MILSAT Run | 1 | X:26445; Y:14390 | Peek Airhawk 225 |
| Rajang Delta Flyby | 2 | X:11450; Y:24435 | Pell Silverbolt 6 |
| Sawah County Crossing | 1 | X:25735; Y:17500 | Peek Airhawk 225 |
| Sawah River Sightseeing | 3 | X:27120; Y:15480, Pekan Tupai Merah | Peek Airhawk 225 |
| Selatan Bikini Run | 2 | X:23530; Y:28425 | Peek Airhawk 225 |
Parachute and Grappler
| Name | Difficulty (in stars) | Location (PDA map) |
|---|---|---|
| Burj Panau | 3 | X:5650; Y:13700, Panau City Financial District. |
| The Cleavage | 1 | X:18390; Y:12960, Panau Falls Casino (Bottom of building) |
| Demam Tinggi Tower Jump | 2 | X:6550; Y:13775, Panau City Financial District |
| Gunung Berbahaya Drop | 1 | X:21065; Y:13765, Kem Kucing Belang Hitam |
| Holy Diver | 2 | X:23450; Y:13410, Bandar Kayu Manis |
| King of Kings | 3 | X:3635; Y:31620, Three Kings Hotel |
| Panau City Slingalong | 1 | X:6600; Y:12960, Panau City Financial District |
| PBC Plunge | 2 | X:15640; Y:4140, Bandar Baru Nipah |
| Slingshot Galore | 1 | X:4825; Y:15800, Panau City Residental District |
| Tangga Ke Syurga Basejump | 2 | X:3230; Y:15385, Panau City Residental District |
| Twin Dive | 1 | X:3275; Y:15430, Panau City Residental District |
Boats
| Name | Difficulty (in stars) | Location (PDA map) | Vehicle |
|---|---|---|---|
| Kenjantanan Island Run | 2 | X:14070; Y:26910 | Snakehead T20 |
| Pulau Naga Powerboat Challenge | 2 | X:15730; Y:276320 | MTA Powerrun 77 |
| Port Rodrigo Return Ticket | 2 | X:11245; Y:28410 | Snakehead T20 |
| Rajang Delta Daredevil | 3 | X:10490; Y:26140 | Frisco Catshark S-38 |
| Rajang River Run | 1 | X:8220; Y:23040 | SnakeHead T20 |
| Ramai Rakyat Island Run | 1 | X:9090; Y:18335 | MTA Powerrun 77 |
| Wet City | 2 | X:8205; Y:15435 | Snakehead T20 |
Unofficial races
There's no challenges, rewards, or recorded best times. These racetracks appear to be tourist attractions.
See also: Easter Eggs and Racetrack.
| Description | Location | Vehicle |
|---|---|---|
| Paved race track. There's always 1 to 3 Titus ZJs with Faction drivers racing around the track non-stop. The racetrack passes through the village of Bandar Selekeh. See the main article for more information. | X:9170; Y:11410. | A Mancini Cavallo 1001 is parked under a roof in the village. Also the aforementioned Titus ZJs. |
| Dirt road race track. There's no one there. | X:11260; Y:4150. | A Titus ZJ is parked somewhere around here. |
| Dirt road race track. There's no one there. | X:29800 Y:15800. | None. |
Just Cause 3

This one features the Mugello Farina Duo.
Race challenges return in Just Cause 3, where completing them will unlock Gear Mods. The races also have leaderboards that work over the internet.
The in-game Rebel drop mentions races in the Windhund 4 info: "Autostraad's Windhund 4 has earned a reputation in Medici's underground racing circuit as a turn-hugging speedster built for Drifting. Top speed 240 km/h."
Air Race
These are usual checkpoint races for Planes and helicopters. If the Nitrous Gear Mod has been unlocked, the provided vehicle will have it. You can start a race to get a vehicle with your upgrades and not have to rebel drop it in.
| Name | Starting location | Liberate to unlock | Default vehicle |
|---|---|---|---|
| Volo Infra Ponte | N 40 42.56? E 5 43.89? | Guardia Plagia II | Urga U17 Akrobat |
| Volo Eagle | N 40 38.28? E 5 42.33? | Cirilla | Eubus Eagle |
| Volo Rischio | N 40 43.95? E 5 34.83? | Porto Cavo | Urga U17 Akrobat |
| Volo Burrone | N 40 41.83? E 5 35.37? | Ponere | Urga U17 Akrobat |
| Volo Dracon | N 40 43.28? E 5 34.31? | Arco Sperantia | U-7 Dravec |
| Volo Stretto Di Ravello | N 40 42.89? E 5 36.64? | Soliana | Urga U17 Akrobat |
| Volo Campo | N 40 46.70? E 5 43.44? | Cava Montana | Urga U17 Akrobat |
| Volo Maxime | N 40 46.03? E 5 40.58? | Cava Grande | CS7 Thunderhawk |
| Volo Metropole | N 40 44.72? E 5 37.92? | Citate Di Ravello | Eubus Eagle |
| Volo Martino | N 40 48.78? E 5 33.15? | Porto Tridente | Urga U17 Akrobat |
| Volo Vulture | N 40 46.51? E 5 44.69? | Refugio Umbra | CS7 Thunderhawk |
| Volo Montania | N 40 46.87? E 5 34.85? | Vista Dracon | Carmen Albatross |
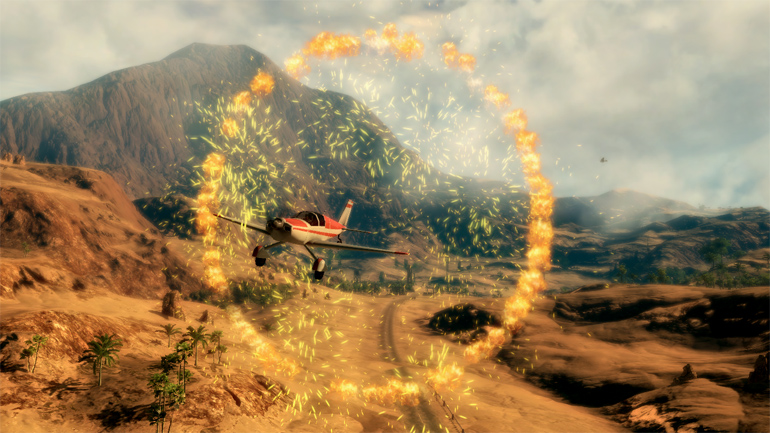
Crash Bomb

.png)
Mugello Quipozza F with the bomb is considered to be one of the Easter Eggs in Just Cause 3.
"Crash bomb" events are where the player is provided with a vehicle that has a Bavarium bomb on its rear end and tasked with driving it to the destination as fast as possible. Along the way, the player has to stay above a specific speed (going below that speed can decrease points) and upon reaching the target the player has to bail out of the vehicle. The vehicle then continues to drive forward until it crashes into the target and explodes. The target is always a group of Medici Military soldiers and a variety of military cars including D.R.M. Stria Facoceros, Stria Obreros, Urga Fura 570s, Weimaraner W3s, and more.
Every race you will pass a military Weimaraner W3 at some point. At that point, you will instantly get Heat level 3 and Urga Szturm 63As as well as a Urga Postolka will spawn to chase you.
Doing these missions will upgrade the GE-64 explosives. There's no need to get 5 gears in all races to unlock the last upgrade. 15 gears will be left over.
List of events:
| Name | Liberate to unlock | Vehicle |
|---|---|---|
| Off-Roader Bomb Blast | Fortalessa | Weimaraner Z80 |
| Hayfield Blast | Cima Leon: Transmitter | Mugello Raffinati Vitesse |
| Lighthouse Blast | Vis Electra | Autostraad Kletterer 300 |
| Laguna Blast | Laguna Del Sol | Weimaraner Z80 |
| Massos Bridge Blast | Soliana | Mugello Quipozza F |
| Mountain Bend Blast | Olivo Moro | '63 Autostraad Weltbus |
| Metro Outskirts Blast | Agro Nove | Mugello Raffinati Vitesse |
| 'Round The Bend Blast | Guardia Litore Torto I | Weimaraner Z80 |
| Montana Bluff Blast | Griphon | Urga Ogar 7 V8 |
| Celata Bluff Blast | Celata | Stria Campania 115 |
| Snowy Peak Blast | Cava Montana | Urga Ogar 7 V8 |
| Incendiario Blast | Porto Coclea | Incendiario Monster Truck |
Tips:
- "Laguna Blast" - Once you're through the town, go off road to the right and go through the farm backyard. Right after that keep to the left a little and over the cliff, down to the beach. Then go straight to the target.
- "Mountain Bend Blast" - This is the only difficult one. The first cliff can be used as the first shortcut, but it may take practice to find the best spot. Turn off the cliff too early and you'll risk flipping the van, or just lose time. It may look like you should go left at the gas station and take the barely visible dirt road, but really it's much faster to get there by going right and using the road. The Medici Military will send multiple Weimaraner W3 cars to stop you. Sometimes there may also be an Urga Bkolos 2100.
- "Incendiario Blast" - Unlike most other Crash Bomb courses, this one's objective is almost 2km away and the arming speed of the bomb is 75km/h. It's also the first and currently only known occasion you can use an Incendiario without unlocking it in the Rebel Drop.
Destruction Frenzy
Destroy as many military assets as possible within the time limit. Rapid destruction builds up a multiplier which makes higher scores easier. The timer does not start until the first destruction. After the timer runs out, the event will not end until your multiplier also runs out. Planning your destruction carefully and setting tethers before beginning is advantageous. Gears earned here unlock Grenade Gear Mods.
Tip: Some destruction challenges may be completed much easier by rigging chaos objects with tethers before starting the timer. Other challenges, notably the Machine Gun Frenzy, may be significantly easier if a weaponized vehicle intended as a target is hijacked.
Land Race
These are usual checkpoint races for ground vehicles, just like in JC1 and JC2, but all the provided vehicles have the nitrous Gear Mod (if available).
Doing these races will upgrade the land vehicles. There's no need to get 5 gears in all races to unlock the last upgrade.
List of events:
| Race name | Vehicle | Starting co-ordinates | Province and settlement (if any) |
|---|---|---|---|
| Hillside Sprint | Stria Toro | N 40 40.685 E 5 44.885 | Baia, near Manaea. |
| Lantuina Sprint | Mugello Raffinati Vitesse | N 40 41.785 E 5 42.385 | Lavanda, near Lantuina. |
| Ridgeline Sprint | Urga Ogar 7 V8 | N 40 41.860 E 5 44.035 | Aspera, near Cima Leon: Centcom. |
| Daredevil Sprint | Mugello Furia MS-316 | N 40 42.270 E 5 43.785 | Plagia |
| Salrosa Sprint | Mugello Vistosa | N 40 40.095 E 5 44.665 | Baia |
| Side Street Sprint | Stria Carera G | N 40 42.490 E 5 41.950 | Feno, near Albeto Pero. |
| Surpicco Sprint | Mugello Quipozza F | N 40 42.325 E 5 44.390 | Plagia, near Surpicco. |
| Seaside Sprint | Urga Ogar 7 V8 | N 40 40.750 E 5 34.510 | Cauda, near Grotta Contrabandero. |
| Maquerello Sprint | Pavouk U-15 | N 40 41.915 E 5 35.845 | Trio |
| Espia Sprint | Windhund 4 | N 40 41.555 E 5 36.585 | Petra, near Vico Tructa. |
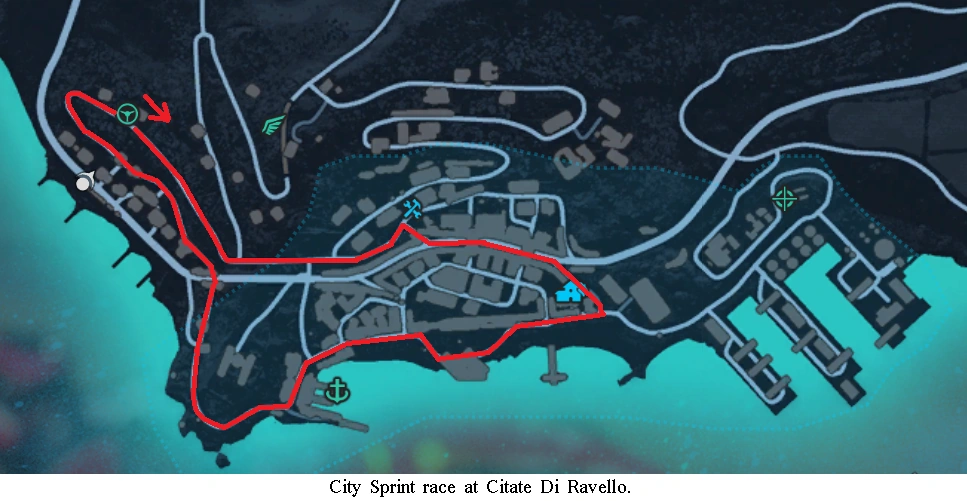
| City Sprint | Mugello Farina Duo | N 40 44.445 E 5 37.920 | Regno, Citate Di Ravello suburb. |
| Railway Sprint | Mugello Vistosa | N 40 46.570 E 5 37.370 | Libeccio |
| South Coast Sprint | Mugello Vistosa | N 40 44.040 E 5 41.815 | Prima, near Vista Fonte. |
| Strip Mine Sprint | Mugello Furia MS-316 | N 40 47.795 E 5 41.490 | Falco, near Falco Maxime: Centcom |
| Mountain Pass Sprint | Stria Kavala | N 40 46.855 E 5 42.130 | Val de Mar |
| Country Sprint | Stria Kavala | N 40 44.465 E 5 42.280 | Prima |
| Grand Slalom Sprint | Urga Ogar 7 V8 | N 40 48.900 E 5 42.130 | Montana |
| Stunt Jump Sprint | Autostraad Kletterer 300 | N 40 44.465 E 5 42.280 | Maestrale |
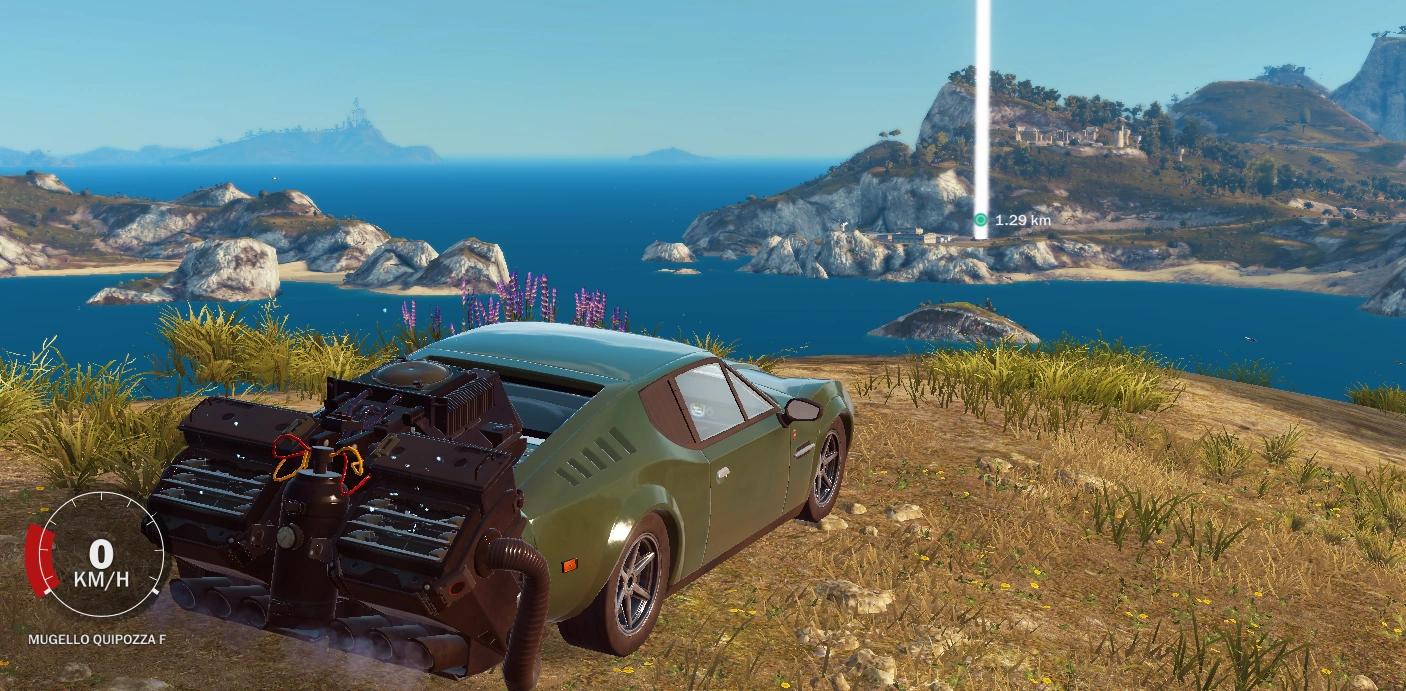
Scrapyard Scramble
In this event the player has to collect large lumps of Bavarium, using Dimah's "Bavarium attractor". The "Bavarium attractor" is basically a magnet that must be grappled to the provided Urga Szturm 63A (which has the nitro Gear Mod, if available). The "Bavarium attractor" can be turned on and off. The car must then be driven around the event area to collect a large amount of Bavarium chunks. Bavarium must be delivered to a big pit with automatically opening doors at the bottom. The player can make multiple deliveries and starting from the end of the first, the Medici Military sends a few Weimaraner W3 cars after you.
Scrapyard scrambles award gears for Tether Gear Mods.
Tips:
- If the vehicle has a nitro upgrade, don't use it. This event is one where "slow and steady wins the race", because speed will break up the towed pile.
- Don't try to make the towed pile of bavarium bigger than the size of a bus (worth around 10000 to 15000 points). The pile swings around and breaks up too easily otherwise.
- Avoid driving near any Red Barrels. They can send your Bavarium flying away. If strategically needed, stop, get out and shoot at some barrels to make a safe path, but it's advised to try different driving routes first, because getting out to shoot wastes valuable time.
- Ignore the chasing Medici Military Weimaraner W3 cars. They are likely to get blown up during the event anyway and stopping to fight them wastes time.
- When completing a delivery, release the "Bavarium attractor" on top of the pit doors. The bavarium chunks might not all always roll down and the Medici Military Weimaraner W3 cars could ram some of it away from the pit.
- There's two types of bavarium, normal and quality. A piece of quality bavarium is worth about 5.5x more than a similarly-sized piece of normal bavarium, but quality bavarium is rarer and most of it will be harder to get.
- It has been reported that the timer will not start if the player uses a helicopter. This allows the player to collect as many pieces of bavarium as they like.
List of events:
| Name | Liberate to unlock | Starting location |
|---|---|---|
| Seaport Scramble | Porto Vena | Unnamed port at N 40 39.000 E 5 43.250 |
| Stockpile Scramble | Espia Bassa | Unnamed industrial facility at N 40 41.650 E 5 37.400 |
| Secunde Scramble | Cava Grande Secunde | Cava Grande Secunde |
| Seismic Scramble | Cava Geminos Nord | Cava Geminos Nord |
Sea Race
These are usual checkpoint races for boats, just like in JC2, but all the provided vehicles have the nitrous Gear Mod (if available).
Doing these races will upgrade the boats. There's no need to get 5 gears in all races to unlock the last upgrade.
The Pescespada SS is provided for every race.
List of events:
| Race name | Starting location (must be liberated to unlock the event) |
|---|---|
| Regata Petra | Babica |
| Regata Precipito | Olivo Moro |
| Regata Cavo | Porto Cavo |
| Regata Rebelles | Grotta Contrabandero |
| Regata Ponte | Vico Spigola |
| Regata Curvare | Arco Sperantia |
| Regata Citate | Citate Di Ravello |
| Regata Tridente | Porto Tridente |
| Regata Laco | Lake in Litore Torto (Near N 40 47.325 E 5 45.495) |
Shooting Gallery
These take place at shooting ranges. The player is provided with a weapon and tasked with shooting at automatically moving target panels. The provided weapon is removed after the event and the player does not lose any previously held weapons.
List of events:
| Name | Location |
|---|---|
| Handgun Training Course | Guardia Plagia II |
| Shotgun Training Course | Cava de Rebelles |
| Machine Gun Training Course | Grotta Contrabandero |
| Revolver Training Course | Refugio Umbra |
| Burst Training Course | Citate Di Ravello |
Wingsuit Course
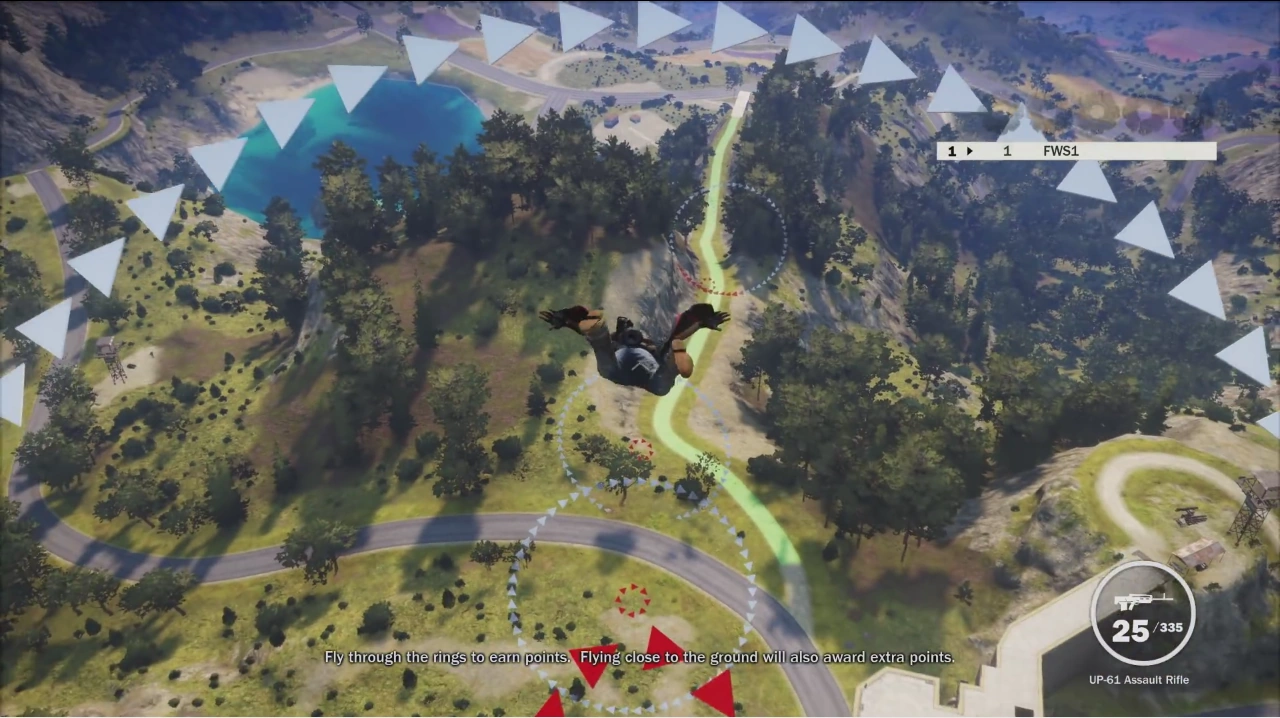

The first known race type in JC3 is Wingsuit races. In these the player jumps off a helicopter to fly through the middle of a series of circles. The middle of the circle awards 2000 points. The circles are arranged so that the player has a choice of which race route to take.
List of events:
| Name | Liberate to unlock |
|---|---|
| Cavern Tour | Vis Electra |
| Manaea Tour | Manaea |
| Fonte Grande Tour | Fortalessa |
| Sirocco Skies Tour | Vigilator Sud |
| Tunnel Tour | Colle Salrosa |
| Rondella Tour | Rondella |
| Via Campania Tour | Lantuina |
| Le Gratia Tour | Porto Le Gratia |
| Monte Dracon Tour | Vico Thunno |
| Undertown Tour | Espia Alta |
| Hilltop Tour | Porto Darsena |
| Darsena Dive Tour | Porto Darsena |
| Olivo Bassa Tour | Olivo Moro |
| Puncta Tour | Puncta Sud |
| Pirate Tour | Grotta Contrabandero (unlocked after finishing the mission Connect the Dots) |
| Canyon Tour | Nacre |
| Vista Plunge Tour | Vista Dracon |
| Badlands Tour | Cava Geminos Sud |
| Aeroporto Tour | Vulture |
| Metropolis Tour | Citate Di Ravello |
| Dragline Dive Tour | Cava Grande Secunde |
| Griphon Tour | Griphon |
| Hayfield Tour | Guardia Val de Mar III |
| Maxime Tour | Falco Maxime: Centcom |
| Cloudy Crevasse Tour | Guardia Montana II |
| Mountain Marathon Tour | Guardia Montana I |
| Snowy Slopes Tour | Cava Montana |
Wingsuit Wonder
Main article: Wingsuit Wonder
This takes place at the eDEN Airship (Sky Fortress DLC). In this challenge you see how long you can wingsuit. Most people apparently get around 2-5 minutes. The Bavarium Wingsuit can let the player get up to 20 minutes or more. Some videos on Youtube show people making it an hour or more.
Mech Arena
Main article: Mech Arena.
These appear as a part of the Mech Land Assault DLC and require the use of a Mech. Throughout the challenge, you are tasked with defeating Black Hand forces, with increasing difficulty as you go along. Completing the challenge will unlock more gear mods for the Mech.
Boat Invaders
These appear as a part of the Bavarium Sea Heist DLC and require the use of the eDEN Spark. Throughout the challenge, you are tasked with defeating Black Hand forces, coming in naval vehicles and attack helicopters. Completing the challenge will unlock more Gear Mods for the Eden Spark.
Just Cause 4
.png)
Just Cause 4 has them sorted into multiple tabs. One of them is "feats".
The Dare Devils of Destruction DLC adds a number of races and other extreme motoring challenges. These are currently listed under missions, so see Category:Just Cause 4 Missions for a sorted table of them.
Trivia
Trivia (general)
- There are several vehicles in the Just Cause game series that have racing numbers on them, but strangely few of them are provided for the above events.
- Makoto MZ 250 - Off-road motorcycle in JC2.
- Custom Geschwind - Off-road motorcycle in JC3.
- Mugello Farina Duo - F1 car in JC3. The only one provided for a race.
- The Rocket - Wooden soap box car in JC3. It's possible to use one to race against Mario.
Trivia (JC1)
- There is only one boat and sea race.
Trivia (JC2)
- All races provide green-marked red paint scheme vehicles, but some of those vehicles are the only time they can be seen.
Trivia (JC3)
- The Bavarium bomb in "Crash bomb" events is an easter egg referencing Back to the Future. The additional rear end placed on a vehicle for the challenge is a homage to the DeLorean time machine (where if driven above 88mph it would time-travel in a loud explosion - called "breaking the time barrier"). The easter egg is most noticeable on a Mugello Quipozza F, as the car and bomb together look quite similar to the DeLorean time machine.
- Game developers mentioned in an interview about Just Cause 3 that Rico was a race-car driver before joining The Agency.
- This is further proven by Alessia speaking to Rico after delivering a Mugello Farina Duo to Rebel drop, saying "Hey Rico! You used to race one of these before... before you left. I mean."
- Some of the races in Just Cause 3 require many gear mod upgrades before they can successfully get 5 gears in every challenge. For example, the "Citate Regata" naval race after liberating Citate Di Ravello will require the "Nitrous II" upgrade in order to get 5 gears. Otherwise, it is impossible.
- There is a loophole to all "Destruction Frenzy" challenges in that the provided weapon / vehicle does not have to be used (optional in simple terms).
- In several destruction frenzies, a vehicle with Vehicle mounted weapons might spawn at the base which can be used instead of your provided vehicle / weapon.
- An example of this is the "FOW Frenzy" at Falco Maxime: Centcom where a CS Navajo spawns and even though the Dionysus PLDS-H can get 5 gears, it is much faster to get 5 gears with the Navajo.
Missions in Just Cause (1) | |
|---|---|
| The Agency (storyline missions) | Devil's Drop Zone · Breakout · Freedom Fighters · The San Esperito Connection · Test of Loyalty · Good Cop, Bad Cop · Some Like it Hotter · Brothers in Arms · River of Blood · Field of Dreams · Broadcast News · Love is in the Air · I've Got the Power · Guadalicano Choo Choo · Some Enchanted Evening · Streets of Fire · Dismissed Without Honors · Sink the Buccaneer · Taking Out The Garbage (vol. 1, 2, 3) |
| Side missions | |
Missions in Just Cause 3 | |
|---|---|
| Act 1 | |
| Act 2 | |
| Act 3 | |
| DLC Missions | |
| Others | |